Cutting up a whole chicken can be quite the scary proposition for the average cook. The truth is, like most things culinary, it’s not as difficult as it seems. All you need is a big cutting board, a sharp knife, kitchen shears, good instruction and the will to get your hands dirty…really, really dirty and sticky to boot. It will feel completely awkward the first few birds you tackle, but like everything, practice will make perfect or at least good enough to get the job done.
Follow the Fat – When you’re cutting up a chicken, this phrase will likely become your mantra as unlike beef, whose fat is marbled nicely throughout the meat, chickens carry their fat underneath the skin. This makes it easier to remove before cooking, but the fat deposits happen to lay across many of the chicken’s primary joints, where you’ll be making your cuts. By learning to follow the fat lines, you’ll be able to break down your bird with ease.
I know most will argue they don’t need to know how to butcher a chicken because your local grocer sells it already cut into pieces. What they may not know is they’re most likely paying more for the pieces than they’d pay for a whole bird. And with the pieces you’re not left with the lovely chicken carcass that can be used to make stock – I know all my novice cooks are saving their carcasses to make homemade chicken stock, right?
If you’re ready to take the plunge into the world of chicken butchery, fasten your seatbelts and let’s go!
Note: It’s important that anything that touches the raw chicken (including your hands) not come into contact with anything else until they’ve been thoroughly washed and then washed again. So unless you’re prepared to thoroughly wash your phone or your children or anything else, don’t be tempted to answer it or touch them once you’ve started.
Another Note: I’m a darn good cook and I’ve been called a wordsmith more than once, but a photographer I am not. It’s my hope that these photos, while not works of art, will serve as a guide to help you as you cut up your bird.
1. Place chicken on a large cutting board, breast side up.
Remove Legs & Thighs
1. Using a sharp knife, cut through the skin between the breast and the top of the drumstick.
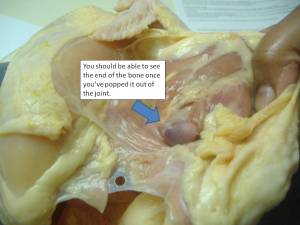
2. Place your hand under the leg and press upwards until the bone pops out of the joint.
3. Cut around the joint to remove the leg and thigh. (The thigh is underneath the drumstick.) Be sure to cut off the oyster, the tender piece of meat found at the end of the thigh, next to the chicken’s backbone.) You will have to lift the bird slightly and lay it on its side to do this.
4. Repeat on other side to remove the second leg.
Separate the Leg and Thigh
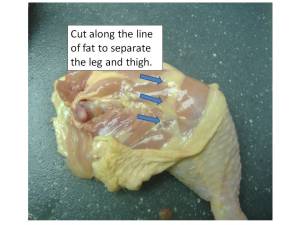
1. Place the leg/thigh on cutting board, skin side down.
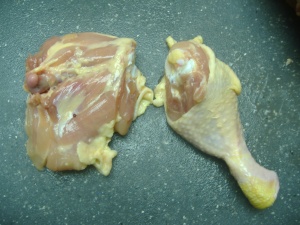
2. Separate the leg and thigh by cutting along the line of fat that runs directly over the joint.
Remove Wings
1. Use your fingers to find the joint that connects the wing to the breast.
2. Cut straight through the joint to remove the wing.
3. Repeat on other side to remove the second wing.
4. Optional: Cut the wing directly through each joint to create drummettes. Save wing tips for stock.
Remove the Back
1. Turn the chicken over so that the breast is on the cutting board.
2. Use kitchen shears or a sharp knife to cut directly along the line of fat that runs diagonally across the chicken, all the way up to the neck. (You will cut through some bone.)
3. Repeat on other side to completely remove the back and neck.
Remove the Breasts
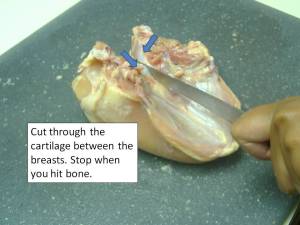
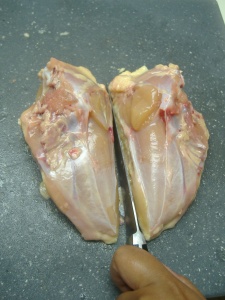
1. Gently cut through the cartilage that separates the breasts. Stop when you hit bone.
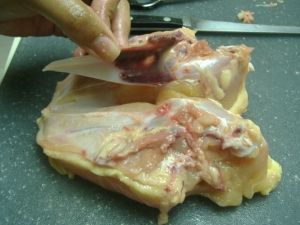
2. Pick up the breast and use your fingers to separate the flesh from the cartilage, exposing the breastbone.
3. Once the cartilage is removed, you should be able to pull the breastbone out. If not, use your knife to help separate the flesh from the breastbone.
4. Place chicken breasts back on cutting board, skin side down, and cut them in half, cutting along the line where the breastbone was. (If you want boneless chicken breasts, simply use your knife to separate any remaining bones from the breast.)
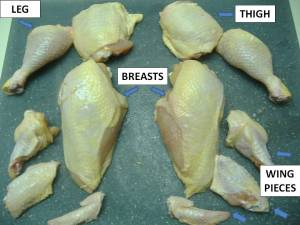
Once the chicken is cut into pieces, use your knife to remove any fat deposits.
See how easy that was? If you’re brave enough to give this a try, please drop me a line and let me






Be the first to comment